For several years I had been casually thinking about building a NAS. Over time we have been gathering more and more data – it’s not just documents now, but high-resolution pictures (and their RAW files) and videos collected over the years. Add to that the movies, music and software files that you need to store somewhere.
And if you’re a video creator, even a casual amateur like me, you are sure to have hundreds of gigabytes, if not several terabytes of footage you need to archive.
Soon, all these add up to such a volume that gets really challenging to manage on a normal computer, even if you have several large hard disks. You have constantly plan and re-plan the distribution of files among the disks, manage the sharing and access control of those files and their backups.
On top of that, we are no longer limited to using a single computer. I use both my desktop and my laptop and it’s a really hassle to sync files between them without messing up versions and potentially losing important work.
Yes, there are cloud storage services like Google Drive and Dropbox and they are fine for small volumes of data like documents, etc. But when you are dealing with large volumes of data, cloud services can get really expensive, not to mention slow as all that data has to go over the Internet.
For such scenarios, a NAS is really helpful. Not only does it abstract the distribution of files across disks, so you don’t have to think about which files go on which disk, but it also makes it very easy for you to manage different shares with proper access controls. And if you are going to store a large amount of data, it will also turn out to be a lot cheaper than cloud services.
Disk redundancy is also a big factor for me. I know that hard disks will fail, sooner or later. So you’d better be prepared to save all that precious data from dying with the disk when that happens. In fact, this was the first reason that made me start looking at NAS options.
I had initially started looking at hardware-based solutions like the ones from Synology and Drobo. They looked very attractive. Just buy the device and the disks, slip them in and you’re done. But they were quite expensive, even without the disks. And there was another big concern. What happens if the device itself fails? Even if the disks were fine, you would probably not be able to access your data until you replaced your device with an exact same model. I didn’t like this potential hostage scenario with my data.
I was therefore looking at building my own NAS. For reasons I just mentioned I was not very keen on hardware-based RAID. I was looking for a software-based approach so that I was not tied to a certain hardware configuration. This would ensure I had access to my data even if I had to replace my hardware components, as long as I was using the same software.
FreeNAS caught my eye. It had all the connectivity options I needed, a nice configuration interface and on top of it all – ZFS! ZFS is this futuristic file system that not only uses software to build RAID-like disk arrays but also has a lot of interesting features like self-correction of bit-rot. Bit-rot happens when bits on magnetic media like hard-disks slowly lose their magnetism and cause a 0 to flip to 1 or vice-versa. This of course leads to minor or major corruption of whatever file that bit was part of.
ZFS counters this by regularly scrubbing the stored data validating the bits. However, there is a big catch! ZFS relies on large amounts of RAM, and while cost is not a prohibitive factor in getting that amount of RAM, RAM itself is not immune to bit-rot. And any such corruption of the data while in RAM can actually introduce corruption in your stored data that was otherwise good.
To eliminate this possibility, ZFS strongly recommends the use the enterprise-class ECC RAM that self-corrects for such corruption in memory. To use ECC RAM, you not only need the ECC RAM itself but also an ECC capable motherboard and CPU combination. An Intel Xeon for example. Yes, this does raise the costs somewhat. But I was more concerned with the availability of such enterprise-class hardware in India. Sure, they are available and the situation is improving with time. But I wasn’t very comfortable with the potential situation where I might not be able to get a suitable replacement part easily and quickly enough if I needed it. With regular consumer-grade parts the situation is much better.
And so as I started looking at alternatives, one of them looked really promising – UNRAID! Similar to FreeNAS, UNRAID was a package of the OS, storage/array management software, various ways to make the stored data accessible and more.
One thing that really made UNRAID stand out in my eyes – it seemed to made with the average tech enthusiast in mind, than typical enterprise-class users that most other solutions seemed to be targeting. Let’s face it – as an average tech enthusiast who has been building his own computers for a while, you are more likely to have a stash of old hard drives of different sizes than the budget to buy several new high-capacity hard drives. And that’s what makes UNRAID shine. Through a proprietary software solution, UNRAID lets you use hard disks of different sizes to build your array.
The end result is an array similar to RAID, but it’s not RAID. Hence the name UNRAID. You can use drives of any size and all of them count towards your total array size. One of the disks needs to work as the parity disk (or you can choose to have two) that protects the array from loss of drives and the ability to rebuild the array, should you lose a drive. The only requirement is that the parity drive needs to be at least as large as the largest data drive.
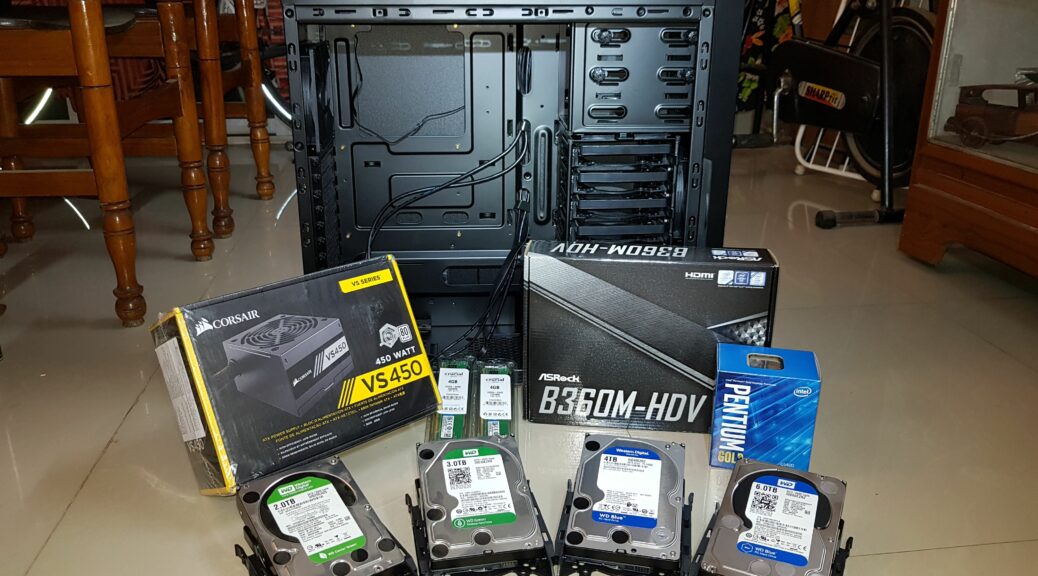
So I took the plunge. The drives I already had at my disposal were – a 2TB, a 3TB, a 4TB and a 6TB. Using the 6TB as the parity I could build an array of 9TB (2+3+4). This was back in 2017 and 9TB seemed quite adequate for me at that time. Even now in 2021, I am using less than 10TB.
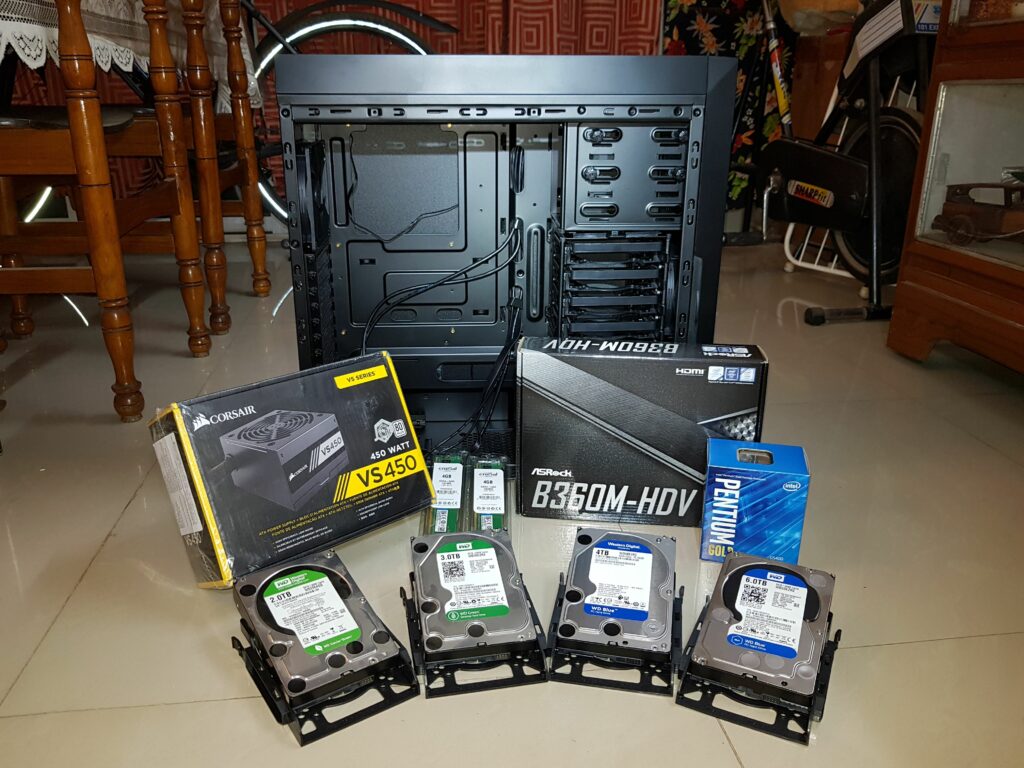
What about the other computer components? For the CPU I chose a basic Intel Pentium Gold G5400 3.7GHz dual-core processor. I chose to have just 8GB of RAM to begin with it as that was more than enough for the basic NAS functionality and at that time I hadn’t really thought of what else I would be using the machine for.
Two things that I had to chose carefully were the motherboard and the case. The motherboard had to have the maximum number of SATA ports for a decent budget. This number seemed to be 6. Sure, there were boards with 8 ports but these were significantly more expensive. The bottom-end of the price range would typically have only 4. So I went about looking for pretty much the cheapest motherboard I could get that had 6 SATA ports. The cheapest, because I didn’t really need much else from the board. Except one thing – to have reliable network performance from UNRAID, it needed Intel ethernet hardware. Not the Realtek ones that are most commonly seen on budget boards. And so I settled on the Asrock B360M-HDV.
The other thing I had to choose carefully was the case. The only feature I needed in it though was the ability to carry a large number of 3.5″ hard drives. Now that’s easy to find in expensive cases. But I didn’t need most of the other features of the expensive cases like lots of radiator mounting options or a large number of external USB ports. Most of the inexpensive cases usually support only 2-3 hard drives. And on top of it all, the options in the Indian market are really limited. I consider myself lucky to have found the Antec P9 – an excellently built case with support for 8 3.5″ drives right out of the box. And you can accommodate a few more by converting the 5.25″ bays. The case has a lot of other nice features too. I won’t go into those here but this case made me a fan of Antec. Did I say it was quite inexpensive too?
If you’re wondering how I would accommodate more than 6 drives when my motherboard could only support 6, well, there are ways to do that using SAS HBA cards. Not very straightforward but using them you can accommodate a lot more drives when the need arises.
The UNRAID OS itself resides on a USB flash drive, so that none of your precious SATA disks are taken up by the OS. So I built up my system, installed UNRAID on my USB flash drive and purchased the licence. Yes, UNRAID isn’t free but requires a one-time licence fee. There are 3 tiers to chose from based on the number of drives you will be using in your system The lowest tier for $59 that let you use up to 6 drives worked for me.
Once the system was built, basic configuration hardly took any time and I was soon able to use the storage facility that is at the core of UNRAID. Over time I have been using my NAS for the following.
- Backup destinations for my various computers. UNRAID also supports hosting Time Machine backup destinations if you use Macs.
- Archiving my video production files. This includes the raw videos as well as various ancillary files like music, etc.
- Various video files that I like watching on TV. Later I also set up a Plex server that let me access these files more easily from not only my TV but other devices and computers as well. More on this below.
- Archiving software installation files and ISO’s.
- Over time I have also moved my documents and pictures. You know, those that usually reside in the Documents and Pictures folders in your computer. With these residing on the NAS, I could access them from any of my computers.
However, UNRAID offers a lot more than just a NAS. It has a built in Docker container system and hypervisor that lets you host virtual machines. Features that are really cool for most home tech-enthusiasts.
A Docker container system may not seem very useful for most people. But here’s where the excellent UNRAID ecosystem of community apps come in. There are ready-made Docker containers for various popular and even obscure apps. You can easily install and start using them. Here are some Docker container-based apps I’m currently using on my UNRAID box.
- Plex – a popular media server that I use to manage my media and stream them to my TV and other devices.
- Duplicati – an incremental, version based backup system that I use to backup some of the important data on my NAS, not only locally but also remotely on Backblaze B2.
- Tailscale – An excellent VPN system that I use to access my LAN from the Internet when I’m outside the house.
UNRAID also has a built-in KVM hypervisor that lets you host virtual machines. If you’re a tech-enthusiast, I’m sure you are well acquainted with the beauty of virtual machines. I have 2 Linux virtual machines running different database applications and a Windows 10 one running all the time. And I can easily fire up a new time whenever I feel trying out a new OS or for any other reason.
Now you may be thinking: how is he running all that with just 8GB of RAM and a dual-core Pentium Gold? Well, that was back in 2017. Over the years there have been a few hardware changes on my UNRAID box. Mostly some shuffling of parts between desktop PC and the UNRAID box as I slowly upgraded some parts on the former. The way it stands now, it’s still rocking the Asrock B360M-HDV motherboard, but it’s maxed out to 32GB of RAM and the CPU is now an 8-core Intel Core i7-9700.
Over time I have also used cache disks. UNRAID cache disks are not part of the main array that stores your data redundantly. Instead they are used to speed up writes. Writing data directly to the array is inherently a little slower as the parity needs to be updated. So you write to the cache disk instead and this is then moved to the array by a process that runs once a day by default, but is customisable. You can get even more significant speed gains by using an SSD for your cache disk. As the cache drive doesn’t need to be very big, using an SSD is feasible here. The cache disk is also used to store certain other data that may be in use all the time, such as the Docker container files and the VM virtual-disks.
I started with a 1TB spinning hard-drive for my cache but am currently using a 1TB NVMe drive. This also frees up a SATA port for use by the array disks. My SATA ports are all used up now for a total useable array size of 15TB. For future expansion I have 3 choices:
- Get a SAS HBA card that sits on a PCIe slot and typically lets you mount 8 more SATA disks using SAS-to-SATA breakout cables.
- Upgrade the motherboard to an 8-port one.
- Gradually replace the lower capacity drives with higher capacity ones.
Well, that’s my NAS story. It’s much more than a NAS really and perhaps the most important part of my home network. I will update here with new posts as and when any significant changes or upgrades come up.